After lots of Christmas cards it time again to make some other types of cards. I used the Pals Paper Arts Sketch #185 as my starting point. This is my creation for masculine birthday card.
For this card I got to use for the first time my tiny wave rotary cutting blade in my Stampin' Trimmer which fits in the Rotary Blade Addition . I love the way you can change the blade, to cut card or use it as a decoration. There is also a perforating blade and a small scallop blade.
Supplies:
Stamp Sets: Label Love, Simply Stars
Card: Early Espresso, Baked Brown Sugar, Crumb Cake, Very Vanilla
Ink: Early Espresso
Other: Seasons of Style Washi Tape, Stylish Strips Embossing Folder, Stampin' Trimmer, Rotary Blade Addition, Tiny Wave Rotary Cutting Blade, Artisan Punch, Tombow
The card is based on this sketch.
Here is the inside of the card.
Thanks for dropping by. Wishing you a Happy New Year!
Angela
Monday, 30 December 2013
Friday, 27 December 2013
Gift Card Holders
Part of final preparation for Christmas included making a couple of gift card holders. I didn't get around to posting these before Christmas, but here they are now. These are the two different styled ones I made. I was inspired by Amy Koenders. Both use the Envelope Punch Board.
This first one is a sliding gift card.
This is the inside of the other one which is a smaller and simpler version.
Have a great day.
Angela
This first one is a sliding gift card.
This is the inside of the other one which is a smaller and simpler version.
Have a great day.
Angela
Wednesday, 25 December 2013
Merry Christmas
Wishing you and your family a happy and blessed Christmas. I hope you are having a lovely day with family and friends. Have a safe and Happy New Year.
Thank you for your support this year.
Angela
Thank you for your support this year.
Angela
Thursday, 19 December 2013
Wishing You
Here is my take on one of the cards we made at the Christmas Extravaganza in November. The card was created and taught by Paula Reid and Heather. I finally got around to making some more at home. You can see their original card here.
I have this Wishing You stamp set so I was able to use it, but I had to make a few minor changes. I don't have the Decorative Label punch they used, so I used my Framelit Label Dies instead. I also made use of the green ribbon I had which was different ribbon to the original card. The one on the left features Old Olive ribbon which is possibly retired. The card on the right features Gumball Green Stitched Satin Ribbon.
I loved the layout of this card, the bright Real Red colour, as well as learning a new technique - The emboss resist with a twist technique. We only embossed part of the front and left part of it smooth so we could stamp an image.
Thanks for visiting and wishing you a very Merry Christmas.
Angela
Labels:
Christmas
,
Emboss Resist with a twist
,
Technique
,
Wishing You
Tuesday, 17 December 2013
Season of Style Gift Boxes
These are some boxes I made for my Music Box team to thank them for their work this year. Music Box is a music and movement session for toddlers and their mums/caregivers, similar to Mainly Music.
What did I put inside? It neatly fits 6 treat sized Whittakers bars.
These boxes were inspired by Tanya Bell. They are easy to make once you know how. They only use one piece of 12" x 12" DSP and some extra card for the belly band. My Simply Scored Tool came in very handy for making this box. And once again the Label Love stamp set and Artisan punch have been very useful to decorate the belly band.
Thanks for stopping by.
Angela
Labels:
3D project
,
gift box
,
No cut folded box
,
Season of Style
Tuesday, 10 December 2013
Clearance Rack Blitz - Up to 80% off!
Get in quick. Don't delay. Clearance Rack items are only available while supplies last. All Clearance Rack items will be listed on the online store. You can purchase items through my online shop here. Items will be removed when sold out and new items will be added, so remember to check regularly.
If you are not able to purchase online and would like to make a purchase, please contact me.
Angela
Sunday, 8 December 2013
Christmas Cracker made with the Envelope Punch Board
The new Envelope Punch Board is a great new tool which I am really enjoying using. It makes envelopes, Christmas crackers and boxes.
This is a three-sided Christmas cracker and inspired by my upline, Julia Leece. You can make two of these out of one sheet of A4 which is great.
Here is the new Envelope Punch Board. A great price at $38.95. Watch the video and learn all about it.
I also made these small Christmas crackers They are 4 1/2" x 6 1/2" which is the size of the DSP stack, so no cutting required.
This small Christmas cracker can fit a lipstick, refill ink bottle, 4 Chocolates Kisses or something else small. They are quick and easy to make as they don't require much decorating.
If you would like to purchase supplies to make either of these crackers or any other craft supplies, please contact me. I can even show you how to make them - your own free tutorial with me.
Thanks for stopping by.
Angela
This is a three-sided Christmas cracker and inspired by my upline, Julia Leece. You can make two of these out of one sheet of A4 which is great.
Supplies:
Stamp Sets: Teeny Tiny Sentiments
Card: Cherry Cobbler
DSP: Seasons of Style DSP
Other: Simply Scored Tool, Envelope Punch Board, Silver
Glimmer Paper, Silver
Ribbon, Star die from Thinlit
Circle Card Die Set, Word Window Punch, Modern Label Punch, Sticky Strip, Tombow
Here is the new Envelope Punch Board. A great price at $38.95. Watch the video and learn all about it.
I also made these small Christmas crackers They are 4 1/2" x 6 1/2" which is the size of the DSP stack, so no cutting required.
This small Christmas cracker can fit a lipstick, refill ink bottle, 4 Chocolates Kisses or something else small. They are quick and easy to make as they don't require much decorating.
If you would like to purchase supplies to make either of these crackers or any other craft supplies, please contact me. I can even show you how to make them - your own free tutorial with me.
Thanks for stopping by.
Angela
Labels:
Christmas
,
Cracker
,
Envelope Punch Board
,
Season of Style
,
Simply Scored Tool
Monday, 2 December 2013
Colour Me Christmas using the Thinlit Card Dies
Yesterday afternoon I had my final monthly weekend class for the year and one of the cards we created was a card using the Colour Me Christmas stamp set and the new Thinlit Card Dies. I made it with an extended flap so that there is more room to write a message.
Materials:
Stamps: Colour Me Christmas,
Ink: Black Stazon, Cherry
Cobbler, Baked Brown Sugar, Old Olive, Summer Starfruit
Card: Cherry Cobbler, Whisper White
DSP: Seasons of Style
Other: Big Shot, Thinlit Card Dies, Stazon
Cleaner, Blender pens, Seasons of Style Washi Tape, Sponges, Adhesive
Thanks for stopping by. Enjoy your week.
Angela
Labels:
Christmas
,
Colour Me Christmas
,
Thinlit Card Dies
,
Washi tape
Tuesday, 19 November 2013
Christmas Star Tag
Here is another way I have used the Christmas Star stamp. This time as a thank you tag for my customers who made a purchase with me this month.
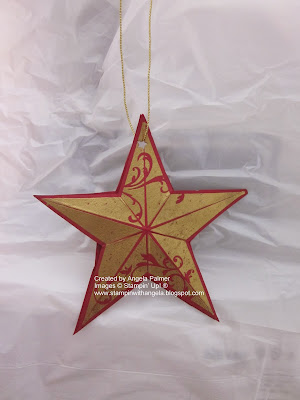
I stamped the star with Versamark and gold embossed it. This time I cut it out and scored the inner lines. I then folded it so that it had dimension to it. I mounted it on top of a flat cut out star so I could right my thank you message on the back - which I wrote before I put them together. I adhered them together with a few layers of Dimensionals in the middle and a drop of Tombow glue at the pointed edges.
Here is a photo which shows the dimension the folds give to it.
Thanks for dropping by.
Angela
Wednesday, 13 November 2013
Christmas Star in Red and Gold
Here is the Christmas Star stamp again. This time I have used red and gold embossing.
Supplies:
Stamp Sets: Christmas Star (single stamp), Teeny Tiny Sentiments
Ink: Versamark, Cherry Cobbler
Cardstock: Whisper White, Baked Brown Sugar, Cherry Cobble,
Other: Stampin' Trimmer, Word Window Punch, Modern Label Punch, Gold Embossing Powder, Heating Tool, Big Shot, Pretty Prints Embossing Folder, Tombow
If you would like to make this card, we will be making this card and yesterday's card at my class on Friday morning. Please contact me for more details.
Thanks for stopping by.
Angela
Labels:
Christmas
,
Christmas Star
,
heat embossing
Tuesday, 12 November 2013
Christmas Star in Blue
I love the Christmas Star stamp which is one of the single stamps available. Here I have used it with non-traditional Christmas colours.
Supplies:
Stamp Sets: Christmas Star (single stamp), Teeny Tiny Sentiments
Ink: Midnight Muse,
Cardstock: Whisper White, Coastal Cabana, Midnight Muse
Other: Stampin' Trimmer, Word Window Punch, Modern Label Punch, Big Shot, Pretty Prints Embossing Folder, Rhinestone Basic Jewels, Tombow
If you would like to make this card and another star one, I hope to hold a class soon. Please contact me if you are interested.
Come back tomorrow and I will show you a similar styled card but with completely different colours.
Angela
Monday, 11 November 2013
Merry Little Christmas Card Class
I have a class coming up which uses the Merry Little Christmas
Simply Created Card Kit. In this class you will create 8 cards.
This is the "Merry Little Christmas" Kit:
The kit contains everything you need (except adhesive
and stamps) to make unique Christmas cards. This includes; cardstock cards,
envelopes, envelope liners, die-cut Designer Series Paper and cardstock
accents, buttons, Baker’s Twine.
The finished card size is 4-1/4" x 5-1/2".
We will make eight cards similar to the samples
shown. We will make four cards using the
“Merry Little Christmas” stamp set and four cards using the
“Wishing You” stamp set.
Below is a card using the kit and the "Wishing You" stamp set.
It was created by Paula Reid and an example of what else can be made with this set.
Cost: Class and Simply Created Card
Kit which makes 8 cards: $24 ($3 per card)
When: Thursday 21st November at 9:30am
RSVP: By 6pm Wednesday 13th November as kits need to be pre-ordered
I still have a couple of spaces available, so please contact me today if you are interested.
If you wish to
come to this class you will need to pre-book and pay so I can pre-order the
kits. I will provide the stamps, ink and
adhesive to use in class. You will also
have the use of my punches and other craft products like the Big Shot so you can
dress up the card a little more. If you
look at the middle card you will see it has a bit of textured added to the card
front. This is not part of the card kit,
but this can be achieved with the use of the Big Shot and the dots embossing
folder. You will have the use of such craft
tools at the class and I will be able to show you what to do.
During the class
you will stamp the greetings and/or images for your eight cards, use punches,
big shot etc. You may not have time to put all eight cards together completely, but you will do have done all the stamping you need
to do, so you can finish assembling them at home.
If
you wish to purchase more than one card kit you may do so. Each additional kit
is $21.
If
you are interested in doing more stamping at home, but don’t know where to
start, perhaps you may also like to buy yourself another card kit, stamp set and ink
pad, or if you are not able to attend the class, you may like to purchase it and make it at home. Please contact me for more details about the card kit and
stamp sets is available.
Please contact me if you would like to attend this class or would like further information.
Have a great day.
Angela
Friday, 8 November 2013
Monday, 4 November 2013
Christmas Extravaganza - Festive Flurry Tag
Last weekend, I had the privilege of working with a wonderful group of Stampin' Up! demonstrators to put on the Christmas Extravaganza event in Auckland. It was the first time I had taken part in such an event and it was a lot of fun.
This is what Jacque Williams and I taught. A lovely Christmas tag inspired by the tags on page 12 and 13 of the Holiday catalogue.
Here is a close up of the tag.
This tags uses the wonderful Festive Flurry stamp set and dies. The dies make it so easy to cut out these snowflakes. The Frosted Finishes Embellishment really finishes it off.
Thanks for stopping by.
Angela
Wednesday, 30 October 2013
Envelope Punch Board is now available
The Envelope Punch Board is now available from Stampin' Up! It's main purpose is to make envelopes, but you can also use it to make many other things such as tags and boxes with it.
Please contact me if you would like to place an order, or order online here.
- It creates totally customisable envelopes in up to 66 different sizes (not to mention a million different colour and pattern options depending on the paper you want to use). Even tried and true envelope sizes will only take you moments to create!
- It’s super easy to use; you only need to measure for the first punch and from there you just turn and score.
- It’s small and lightweight;
- It even has a clever scoring tool as well as a punch that lets you create rounded corners on your envelopes.
- It’s easy to keep it all together; the stylus storage compartment and two punches are designed into the tool so you don’t have a bunch of little pieces to keep track of (even the instructions are printed right on the tool so you won’t lose them!).
- The price is terrific--especially for a tool that does so much! Only $38.95
Please contact me if you would like to place an order, or order online here.
Tuesday, 22 October 2013
25% off 25 Stamp Sets for one week only!
We’re celebrating Stampin’ Up!’s 25th anniversary all year long, but during the week of the actual date (25 October to be exact) we thought we should pump up the party even more. So what better way than a sale on the very products that started it all: stamps, of course!
You can download a list of the 25 stamps sets on sale with 25% off here.
Or take a look at the online store here.
I will be putting an order in tomorrow, so please let me know by Wednesday midday. You can also order online in my online store, or contact me as I may put another order in on 28th October.
Thinlit Card Dies are here!
They’ve been called flip cards, flip flop cards, swing cards, and more—but they have always been a bit tricky to create. Not anymore! Our amazing new Thinlits Card Dies cut and score to create a card that flips in just one step.
These new card dies come with extra die pieces that have versatile designs, so you can use them on other projects, not just flip cards. (The Circle Card Thinlits Die comes with 10 total pieces; the Label Card Thinlits Die comes with nine total pieces.)
With the number of dies your getting, plus the die that creates the card itself, the price is great value especially to create an interactive card.
133479 | Label Card Thinlits Die | $67.95 NZD | ||||
133480 | Circle Card Thinlits Die | $67.95 NZD |
Download the flyer for more information about the new Thinlits Card Dies here.
Feel free to contact me if you would like to place an order, or go to my online store here.
Friday, 18 October 2013
Festive Flurry Swing Card
My upline, Julia Leece, created a couple of swing cards using the Festive Flurry stamp set and dies. I was inspired by her wonderful cards and decided to CASE the cards and technique and this is my creation. My card uses the Winter Frost DSP Stack which is great for cards.
It you are intestered to see Julia's creations which inspired me, you can see those here and here.
Have a great weekend.
Angela
Materials:
Stamp Sets: Festive Flurry Stamp Set and Dies
(Die 1 is smallest, die 4 is the largest one)
Teeny
Tiny Sentiments
Card: Coastal Cabana, Whisper
White, Silver Glimmer paper
Ink: Coastal Cabana
DSP: Winter Frost DSP Stack
Other: Word Window Punch, Modern
Label Punch, Dimensionals, Sponges, Glue Stick, Silver Ribbon – optional
It you are intestered to see Julia's creations which inspired me, you can see those here and here.
Have a great weekend.
Angela
Labels:
Festive Flurry
,
Swing card
,
Technique
,
Winter Frost Stack
Tuesday, 15 October 2013
Joyful Christmas Clear Envelope Album
In the weekend I had my monthly card/craft class and one of the projects we made was this clear envelope album inspired by Connie Stewart. It uses the Joyful Christamas stamp set.
I used the Frosted Finishes Embellishments, but embossed them with gold embossing powder so that they go with the gold embossing powder on the Poinsettia. This was a great tip from Connie Stewart.
Here is the inside. It uses the clear envelopes which Stampin' Up! offers. They ladies that came to the class didn't know about these, but thought they were great and a few of them have ordered some.
Supplies:
Stamp Set: Joyful Christmas
Cardstock: Baked Brown Sugar, Crumb Cake, Rich Raspberry
Other: Versamark, Heat Tool, Gold Embossing Powder, Pretty Print Embossing
Folder, Big Shot, Frosted Finishes Embellishments, Crumb Cake Seam Binding,
Candy Dots Brad Bases, Paper Piercer, Piercing Mat, Clear Envelopes
Thanks for stopping by.
Angela
Labels:
album
,
Christmas
,
Clear envelope
,
Joyful Christmas
Wednesday, 9 October 2013
Join Stampin' Up for $25
Stampin' Up have a two week promotion from 7th till 21st October. New recruits can join the 25-year celebrations with a special $25 starter kit.
- This offer is only good for two weeks, so take advantage of it right away!
- During this offer, only the special $25 starter kit will be
available; the regular $189 starter kit will not be available. The
Starter Kit includes
- $26.95 worth of Stampin’ Up! product (it must be more than $25, but not more than $26.95)
- Business pack which includes
- A box of annual catalogues
- A package of the current seasonal catalogues
- Getting Started DVD
- Customer Order Forms
- Customer postcards
Tuesday, 8 October 2013
Today's Kids' Holiday Card Class
Today I had six children come along to a holiday card class. They all did so well. These are the cards they made.
Thanks for stopping by.
Angela
Thanks for stopping by.
Angela
Thursday, 3 October 2013
Party Time & More Hostess Dollars
October Party More Promotion - Get a bonus $25 of hostess dollars to spend with a qualifying order as part of Stampin' Up!'s 25th birthday celebrations.
Offer: Get $25 extra hostess dollars when you have a qualifying* party. *$450 in party sales before shipping.
When: 1st - 31st October 2013
What does this mean?
Host a $450 party, or
Place a $450 order, or
Get together with some friends/family to put together a $450 order.
You will get the usual $55 hostess dollars plus a bonus $25 of hostess rewards - that is $95 in total to spend on whatever current products you like, including our exclusive hostess items.
Please contact me if you would like to know more.
Angela
Monday, 30 September 2013
Flower Shop Gift Box with Cards
Recently I had one of the young ladies who has been coming along to my classes, sign up as a Stampin' Up! demonstrator. She joined up under me as my first downline. I am excited to have her on my team and I look forward to supporting and helping her. There are many great benefits of being a Stampin' Up! demonstrator and I hope she will enjoy it as much as I do, as well as have a lot of fun using their great products.
This is a small gift I made for her.
Supplies:
Stamp Set: Flower Shop
Cardstock: Very Vanilla, Raspberry Ripple, Midnight Muse
DSP: In colours 2012-2014 (last year's design)
Ink:Raspberry Ripple, Summer Starfruit, Midnight Muse,
Other: Simply Scored Tool, Stampin' Trimmer, Pansy Punch, Pearls, 1" Circle Punch, Boho Blossoms Punch, Dimensionals, Tombow, Sticky Strip
Angela
Labels:
Flower Shop
,
mini pizza box
,
small gift cards
Sunday, 29 September 2013
Calm Christmas Thank You Tag
This is the Thank You tag I made for my customers who put in an order with me recently using the Calm Christmas stamp set. I love this Dove stamp and the
new Pretty Print embossing folder with its deep texture. This tag
features a new favourite colour combination which I have used on some of
my Christmas cards - Midnight Muse and Whisper White. Something a
little different from the traditional red and green colours.
Supplies
Stamp set: Calm Christmas
Cardstock: Whisper White, Midnight Muse
Ink: Midnight Muse, Garden Green (marker)
Other: Pretty Print Embossing Folder, Big Shot, Label Collection Framelit Dies, Dimensionals, Tombow, Ribbon, Star Punch (to punch hole for ribbon - non SU)
Angela
Supplies
Stamp set: Calm Christmas
Cardstock: Whisper White, Midnight Muse
Ink: Midnight Muse, Garden Green (marker)
Other: Pretty Print Embossing Folder, Big Shot, Label Collection Framelit Dies, Dimensionals, Tombow, Ribbon, Star Punch (to punch hole for ribbon - non SU)
Angela
Labels:
Calm Christmas
,
Christmas
,
Pretty Print Embossing Folder
,
Tag
Wednesday, 25 September 2013
Strawberry Shortcake Punch Art
As I mentioned in my post yesterday, my daughter, Danielle, turned seven earlier in the week. She had a Strawberry Shortcake themed party with her friends, so I thought I would make her a Strawberry Shortcake card to keep with the theme. This is the card I made for her.
My upline, Julia Leece, has a friend, Kathryn Tyrrell, who had already made a Strawberry Shortcake figure with punch art so she had done all the hard work for me. She had figured out which punches would be best to use. Kathryn had some very detailed pictures and instructions which she lent me and with that, I made this card. It was made with lots of different punches. I had a few of the punches, but the ones I didn't have, Julia kindly let me come over and use hers. So a big thank you to Kathryn for her pictures and instructions and also Julia for letting me use her punches.
If you would like to know how to make this Strawberry Shortcake punch art, please contact me and I will pass your details onto Kathryn and she can send you the instructions.
Thanks for dropping by.
Angela
Labels:
Punch Art
,
Strawberry Shortcake
Tuesday, 24 September 2013
Craft at a birthday party
My daughter, Danielle, turned seven years old yesterday. On Saturday she had a birthday party with her friends and we made a craft as one of the activities at the party. This is what they each made.
There were ten girls, so a few too many to teach how to make this gift bags, so I pre-made them and they got to decorate the fronts of them. I pre-cut the coloured card for the front, the embossed white card and pre-punched the butterflies. They got to choose the colours they liked and put it all together. They seemed to enjoy the activity. This was their goodie bag to take home. The gift bag is based on the gable box tutorial.
I had also planned for them each make a Petite Purse Bag which nicely fits a small snack sized chocolate treat. Only some of them had time to finish them at the party and so I finished the rest of for them for them.
Come back tomorrow and see the Strawberry Shortcake punch art card I made for Danielle's birthday.
Angela
Labels:
3D project
,
Birthday Party
,
Gable Box
,
Petite Purse Die
Thursday, 19 September 2013
Kids' School Holiday Card Class
Have fun making these three cards using
punches and other Stampin’ Up craft tools.
When: Wednesday 2nd October
Time: 1pm - 3pm
Where: Unsworth Heights
area
Cost: $15 per child
RSVP: By Monday 30th September
This class is for primary and
intermediate school aged children and suitable for both girls and boys. For either class, five year olds must be accompanied by an
adult. Adults of older children are also welcome to attend and make the
projects too. Please let me know at the time of booking, so I can have
enough resources prepared.
If you are interested in either of these classes, but these class times
do not suit, please let me know as I may also hold other classes in the
second week of the holidays if there is enough interest.
Feel free to contact me if you have any further questions, or to register.
Angela
Wednesday, 18 September 2013
Kid's School Holiday Craft Class
Here are some fun projects the kids can make in the holidays when they attend one of my classes.
Project One: One Gift bag of either design
Project Two &
Three: Christmas Bag Toppers:
Christmas
may seem a little way off, but these two crafts are perfect for gifts for
friends or teachers.
You will get to
make:
Two reindeer bag
toppers with the long cellophane bag attached. (One will be
filled with Jaffas in class.)
Two Christmas bag toppers with the cellophane bag attached. These are ideal for biscuits or other small gifts. (Biscuits not included.)
When: Monday 30th
September
Time: 1pm - 3pm
Where: Unsworth Heights area
Cost: $15 per
child
RSVP: By Sunday
29th September
This class is for primary and
intermediate school aged children and suitable for both girls and boys. For either class, five year olds must be accompanied by an
adult. Adults of older children are also welcome to attend and make the
projects too. Please let me know at the time of booking, so I can have
enough resources prepared.
If you are interested in either of these classes, but these class times
do not suit, please let me know as I may also hold other classes in the
second week of the holidays if there is enough interest.
Feel free to contact me if you have any further questions, or to register.
Angela
Labels:
gift bag
,
Kids holiday class
,
Punch Art
Subscribe to:
Posts
(
Atom
)